How to Set Up IPTV on IPTV Extreme Pro: A Complete Tutorial
In this article, we will guide you through the process of setting up the IPTV Extreme Pro app on your Android device. IPTV Extreme Pro is an incredibly versatile player known for its wide array of performance tuning options, making it a powerful tool for streaming IPTV content. Whether you’re using the free or paid version, this app allows you to add and manage playlists efficiently, providing a smooth and customizable viewing experience.

Before we dive into the steps, make sure you’ve downloaded the IPTV Extreme or IPTV Extreme Pro app from the Google Play Store. Below are the links to both the free and paid versions:
- Free Version: IPTV Extreme – Google Play Store
- Paid Version: IPTV Extreme Pro – Google Play Store
How to Add IPTV Channels to IPTV Extreme Pro
Let’s walk through the process of adding IPTV channels to your IPTV Extreme Pro app by using an M3U playlist. Here’s the step-by-step guide:
Step 1: Download and Launch the App
After downloading either the free or pro version of the app from the Play Store, open IPTV Extreme Pro on your Android device. Give the app a few moments to load all the essential elements before proceeding to the next step.

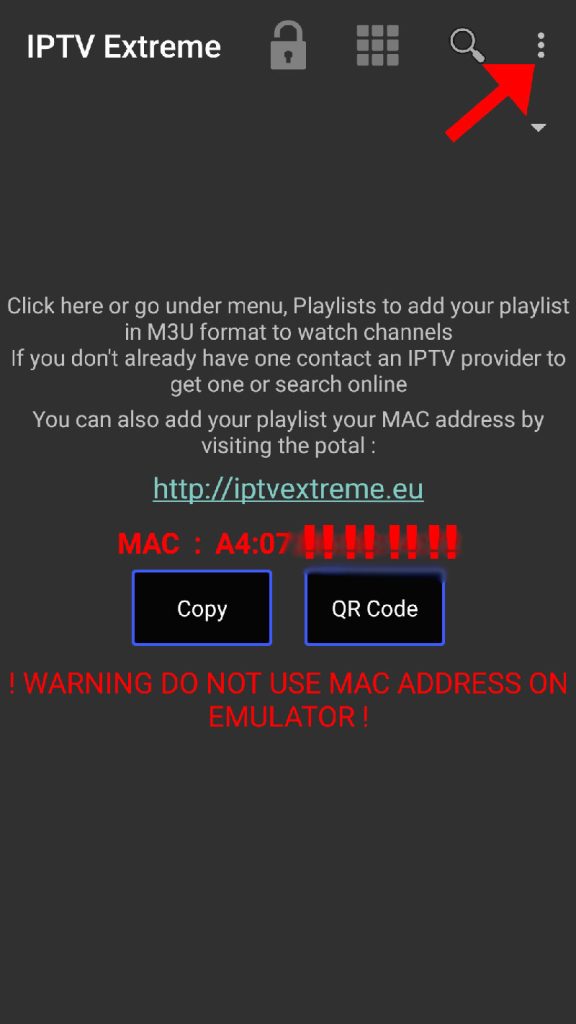
Step 2: Access the Menu
Once the app has launched, click on the three-dot menu icon located at the top-right corner of your screen. This will open a dropdown menu containing various options.
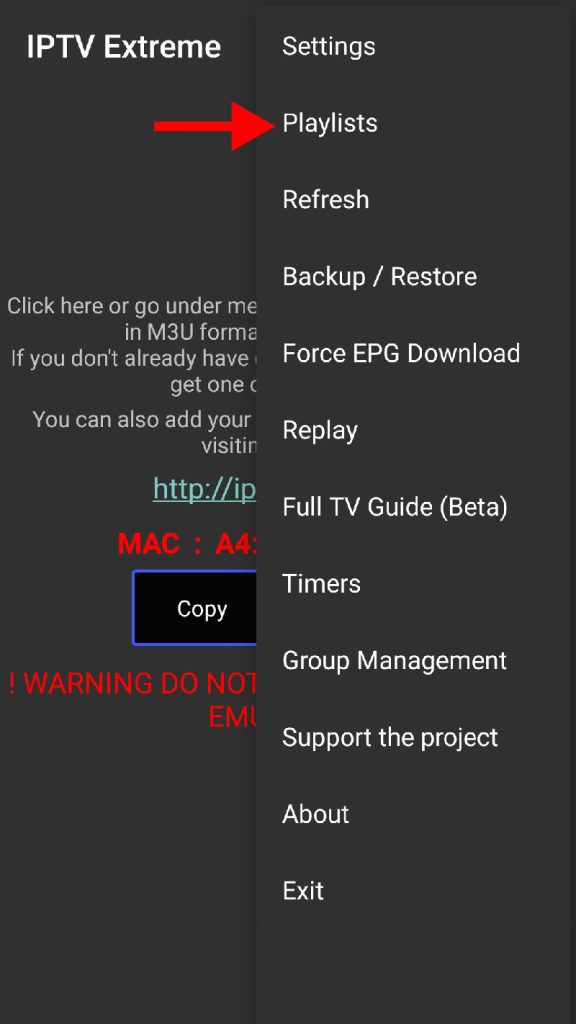
Step 3: Select Playlists
In the dropdown menu, choose the “Playlists” option, which is highlighted with a red arrow on your screen. This is where you’ll manage all your IPTV playlists.
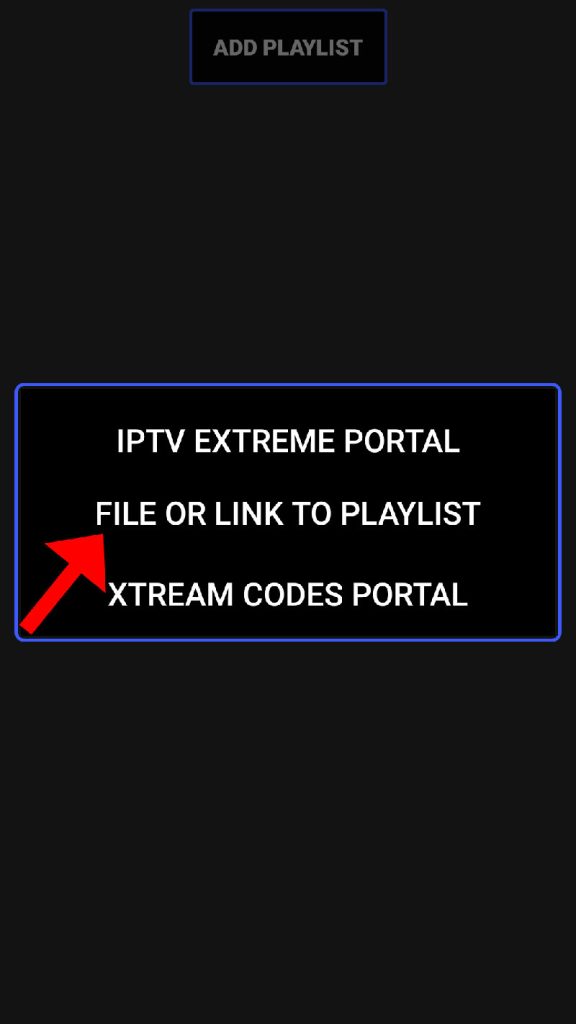
Step 4: Add a New Playlist
After navigating to the playlist section, click on “ADD PLAYLIST”. This is where you’ll start the process of importing your IPTV channels via M3U URL or a saved file.

Step 5: Choose Playlist Source
In the following screen, select “FILE OR LINK TO PLAYLIST”. This option allows you to either paste an M3U URL from your IPTV provider or upload a previously saved M3U playlist file from your device.
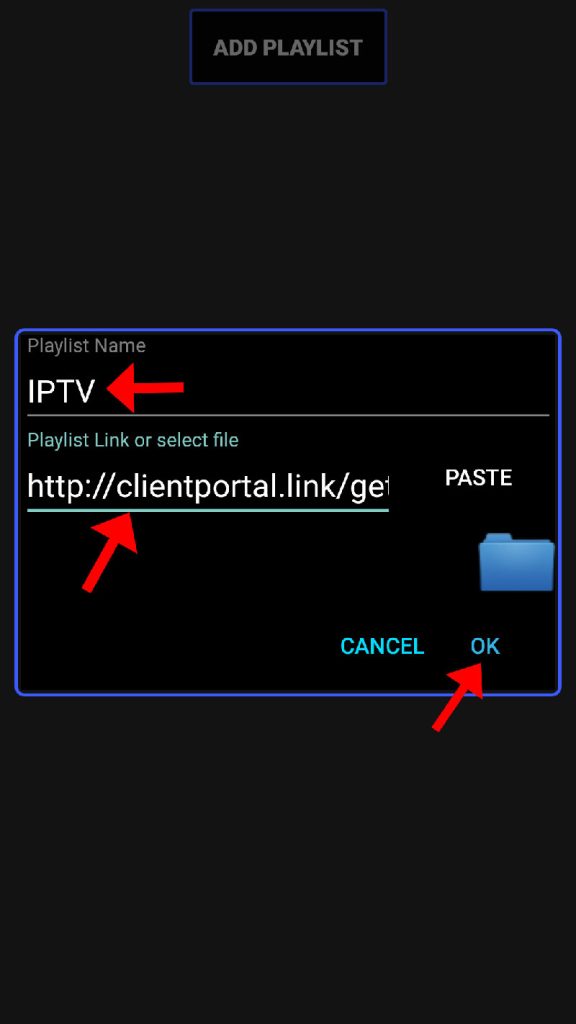
Step 6: Name and Enter Your Playlist
Now, it’s time to give your playlist a unique name so that you can easily identify it later. Once you’ve entered the name, insert the M3U URL that you received from your IPTV provider in the appropriate field. After entering the required information, click on “OK” to confirm.
Step 7: Wait for Playlist to Load
Once you’ve added the playlist, the app will begin loading the channels. Depending on the size of your playlist and the server speed, this process may take a few minutes. Be patient while the app organizes the channels.
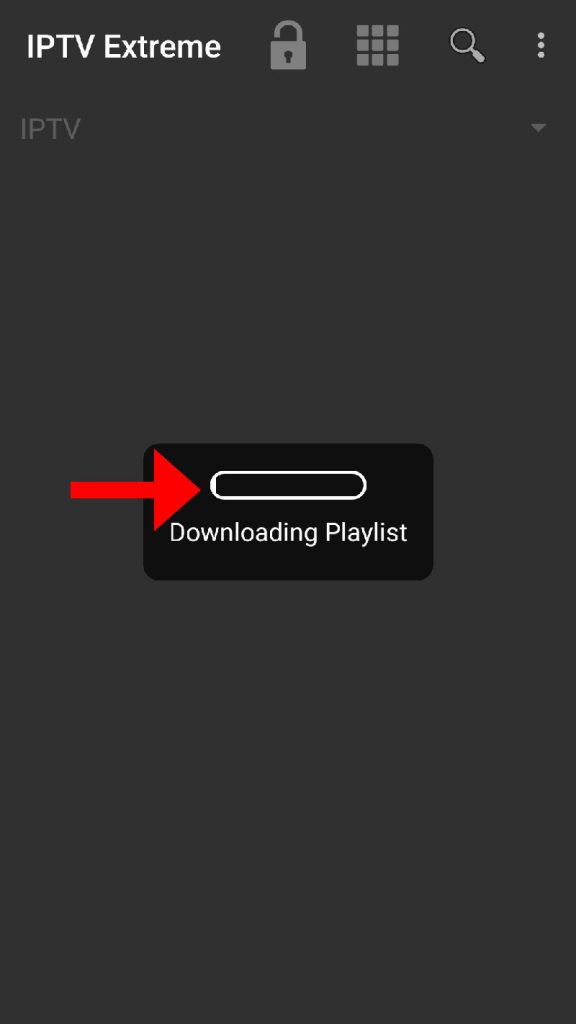
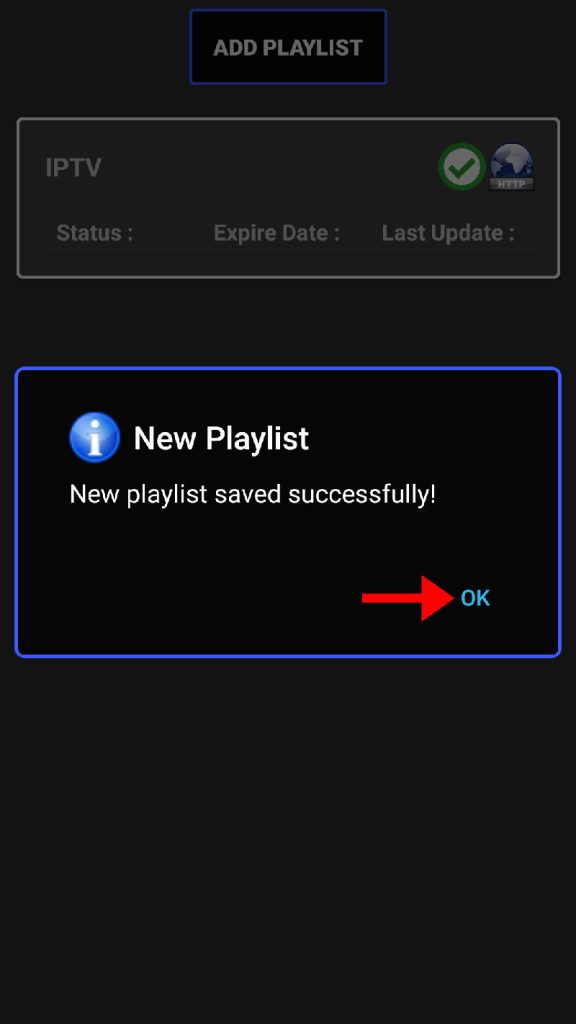
Step 8: Confirm the Playlist
After the playlist has finished loading, click “OK” to confirm that everything is set up properly. This step ensures that the playlist is saved and ready for use.
Steps to Add EPG on Perfect Player for IPTV Streaming
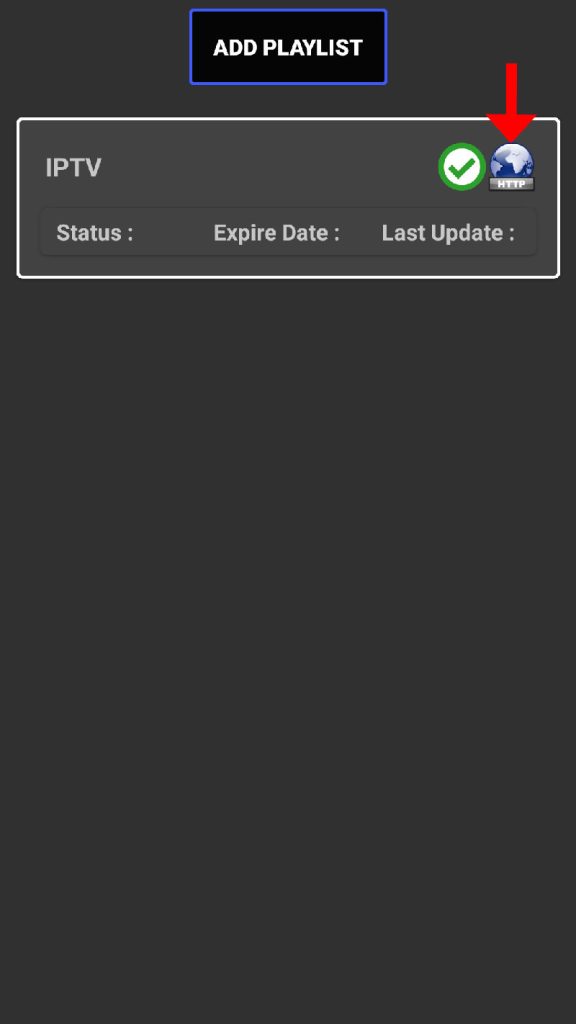
Step 9: Access the Playlist
Now, you’ll see the playlist you just added in the playlist section. Click on it to open and browse through the available channel groups.
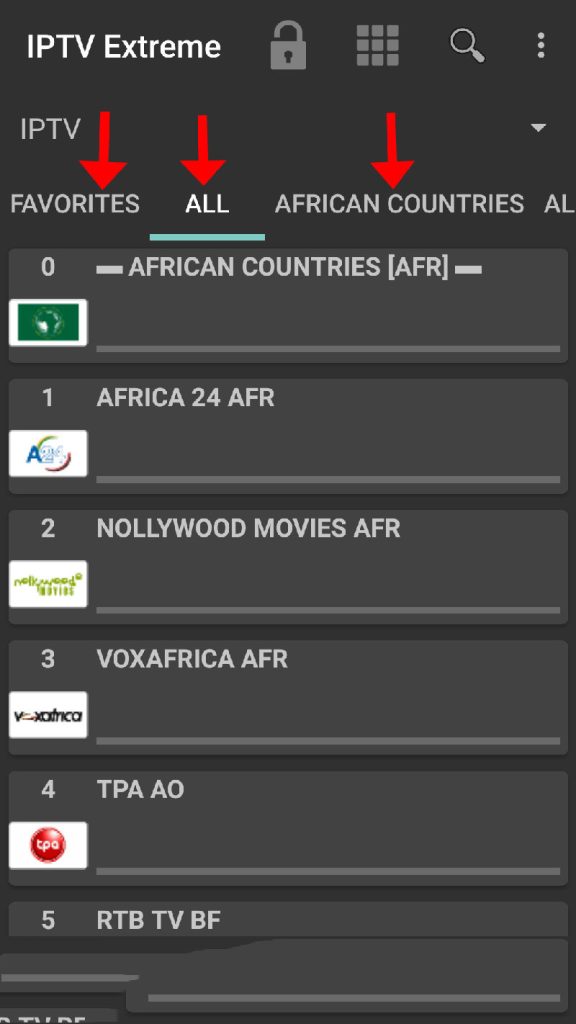
Step 10: Start Streaming
Once inside the playlist, you’ll be able to select from different channel groups, typically organized by country, genre, or provider. Choose a group and start streaming your desired channel.
IPTV Extreme Pro: Standout Features
IPTV Extreme Pro comes packed with a variety of features that significantly enhance the IPTV experience. Here’s an overview of some of the most useful features:
- Integrated Player: The app includes a built-in player with both advanced and light versions to cater to different user preferences and device capabilities.
- Chromecast Support: Although still in beta, the app supports Chromecast, allowing you to cast your IPTV streams to larger screens.
- Parental Control: Easily restrict content to ensure safe viewing for younger users by setting up parental controls.
- Remote Control Support: The app is fully compatible with remote controls, making it easy to navigate on Android TV or set-top boxes.
- Backup/Restore Settings: You can back up your app settings and playlists and restore them as needed, offering flexibility for switching devices or restoring your setup after a reset.
- M3U Playlists Support: IPTV Extreme Pro supports M3U playlists, allowing for seamless integration of IPTV channels from your preferred IPTV provider.
- Multi EPG (TV Guide) Support: Access electronic program guides (EPG) with support for multiple formats, providing a detailed view of the upcoming shows on your channels.
- Auto EPG Update: The app can automatically update EPG data, ensuring you always have the latest schedule information.
- Picons Support: Add Picons (channel logos) in various sizes, enhancing the visual experience of your channel list.
- On-Demand Program Downloads: You can download on-demand content from supported IPTV providers and watch it at your convenience.
- Live Streaming Recording: With the built-in recording feature, you can record live streams, even setting time limits for recording specific shows or events.
- Themes and Customization: IPTV Extreme Pro offers over 10 different themes, allowing users to personalize the app’s appearance.
- Timer and Memo Features: The app allows you to set timers for recording, schedule reminders for TV events, and even search for similar events in the TV guide.
- Auto-start on Boot: You can configure the app to launch automatically when your device starts, ensuring that you always have quick access to your IPTV content.
Final Thoughts
IPTV Extreme Pro is a powerful and feature-rich app for Android users who want to take their IPTV experience to the next level. Whether you’re looking for advanced features like recording live streams or just want a simple, reliable way to watch IPTV, this app has you covered. With the ability to easily add playlists, customize your viewing experience, and enjoy seamless streaming, IPTV Extreme Pro is a top choice for IPTV enthusiasts.
Download the app, follow the steps outlined in this guide, and you’ll be streaming your favorite channels in no time!
Steps to Set Up IPTV on GSE Using Remote Playlist
